
How to use your Augmented Reality products
Your quick start guide to using the L&T ART app & Mat
Get under the skin of top Limbs & Things task trainers with Augmented Reality Training (ART) Mats and the ART app.
Using the Limbs ART app, you can scan your compatible trainer and ART Mat to see an overlaid digital rendering of the internal anatomy. Students can examine the internal layers of the model, and follow animations of procedures, along with a guided lesson.
To get you started, we've compiled a quick start guide to understanding, and using, your complete ART training package.
Jump to a section...
How to get the ART app
 |
The L&T ART app is available to download for FREE on Google Play & the App Store. See links below. |
|
|
Compatible with tablets & smart phones, the app supports Augmented Reality learning when used alongside a range of trainers & ART Mats. Or, for using 3D anatomy for independent study outside of the classroom. |
||
|
|
Setting up your ART Mat
- Ensure your mat is laid flat
- Keep the trainer aligned with its designated space
- Keep other objects clear of the mat's surface
- For easier scanning, avoid glare from lighting
- Watch our Hints & Things video on setting up your ART Mat, by clicking the play button on the image
Start using the L&T ART app
Getting to know the L&T ART app once it's on your device.
- Open the L&T ART app
- Allow L&T ART to "access camera" (the camera will only be used during AR interactions)

In-app navigation
- Products – access to the full list of ART compatible trainers
- Settings
- Contact us, submit feedback
- Languages - English, French, German, Mandarin, Portuguese, Spanish
- Limbs Privacy Policy
- Clear cache & downloads
- ART User Guide

Product menu
- Current ART compatible Limbs & Things trainers
- Model description, download product specific software (once downloaded, product will have an open button), link to product webpage
- Key for product software status - downloaded, available, new, coming soon

Selecting an app mode
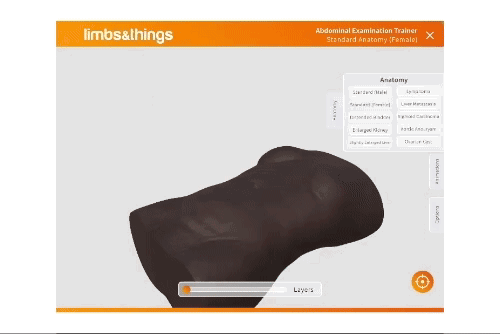
· Interactive Anatomy – 3D anatomy is available to interact with as soon as you download the software. This free-to-use feature works independently of the trainer to support individual learning
· Augmented Reality - Scan the product mat to unlock procedural animations & anatomy overlays on your training model. Any device in your classroom that supports the app can be used to access AR features, ideal for group learning
Note: Both modes show the same tabs, but some functionality in Interactive Anatomy will only work once the mat has been scanned by the device.
Once software is unlocked, it will remain available on the device for use without the mat, until the software is updated or the cache on the device is cleared.

Gesture control in the L&T ART app
When you open the software for your chosen training model, you will be shown a quick start guide of hand gestures to navigate around the on-screen components. Check out the full list below.
Panning
With 2 fingers on the screen, move the on-screen image while maintaining the current aspect.

Rotating
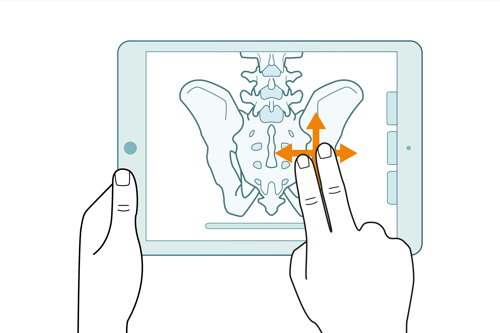
With 1 finger on the screen, rotate the on-screen image to see all angles.

Zooming
With 2 fingers on the screen, use the "pinch in/out" movement to change the zoom of the image.
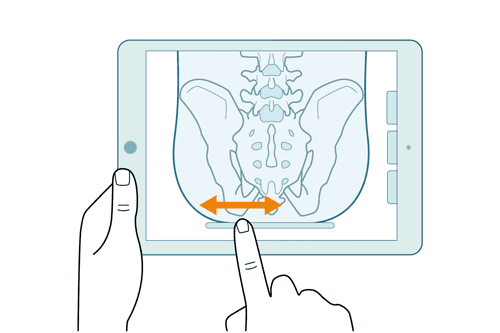
Layers
Use the slider at the bottom of the screen to adjust the layer of anatomy you are looking at. Right to remove layers, left to add layers.
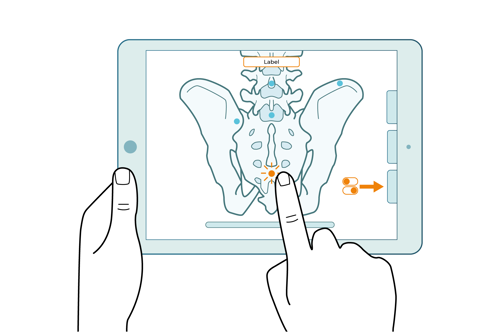
Labels
When the labels option is selected, the anatomy will show colour spots across the image/layers. Press a spot to view the label at the top of the screen. Note: Labels are located around the image, you may need to rotate to clearly identify its location.
Gesture controls in action
Easily view and manipulate the on-screen elements to discover more about the internal anatomy of your trainer
Features in the ART app
Within Augmented Reality and Interactive Anatomy modes you'll find a variety of features to utilise in and out of the classroom.

Each ART compatible task trainer has multiple anatomy models for various pathologies.
Navigate through the layers to view how the internal organs differ in each condition, and view the related labels.
You can unlock animations in the classroom by scanning the mat (with or without the trainer) in Interactive Anatomy mode and use gesture controls to move the model on-screen.
Play the Augmented Reality animations as an overlay on the physical trainer set up on the ART Mat. Move around the trainer and the view moves with you, giving a clearer picture of what happens internally during procedures.
Access to optional settings for your trainer, available options appear in orange:
- Labels - Toggle this option on to see anatomy markers throughout the diagram's layers
- Position - Alternate positioning, if available for your model
- Skin Tone - Switch between light and dark skin tones
Review the common gestures used to navigate in AR mode.
The position icon, seen in the bottom right corner of Interactive Anatomy mode, resets the diagram to its original position.
You're all ready to go!
Visit your regional site to find the latest products available with Augmented Reality Training Mats by clicking the link below, or contact your local distributor for more details.


